Easy Way to Return to Firelink After Quelag
Full Blighttown Walkthrough
Access From the Depths
The entrance to Blighttown can be found in the same room as Domhnall of Zena. Acquire the key to unlock Blighttown by defeating the boss of the Depths: the Gaping Dragon.
- From thesewer bonfire, head straight out the hallway and take the first right. After you descend a very short staircase, find a hidden ladder behind some boxes, to your left. Proceed down the ladder and then, down the long stairway. Continue in the same direction after you exit the stairs and you'll find a broken metal fence, across the room. This is the entrance.
- Note: that The Depths' door to Blighttown can not be opened from the Blighttown side.
Access From Darkroot Basin
This path can be taken only after killing the Taurus Demon.
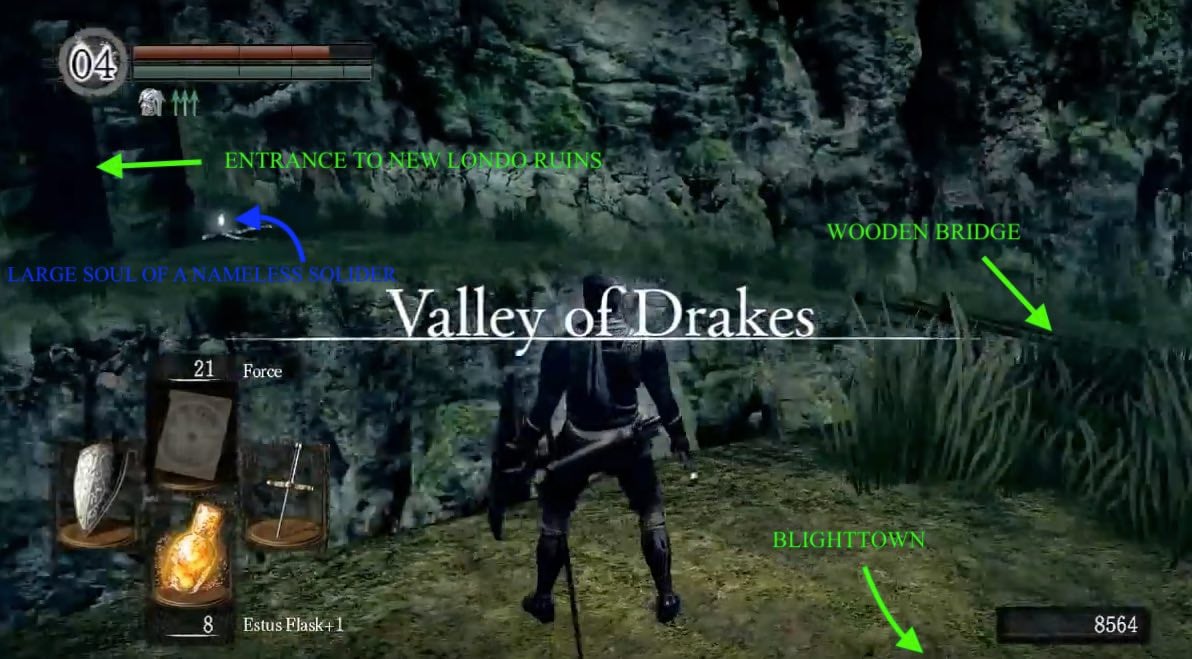
- From Blacksmith Andre in Undead Parish, head down the stairs and into Darkroot Garden. Take the first path on your right and follow it downwards, to the very bottom of Darkroot Basin. You should notice small cave in the cliff side, guarded by a Black Knight. Enter the cave and take the elevator down to arrive in the Valley of Drakes. Follow the sloping pathway upwards until you get to a big cave on the left hand side, and enter; you'll have to battle some Drakes on your way through the valley toward the cave to Blighttown.
- See below for the key to get back to Firelink Shrine.
Access From New Londo Ruins
This path can be used right after entering from the Valley of Drakes entrance.
- After entering the cave, proceed ahead to the end of the wooden platform. On your left, find a chest holding a key. After acquiring the key, head back to the mouth of the cave, and there should be a wooden bridge (different to the rope bridge you came across). Across that bridge is the entrance to New Londo Ruins. The key we picked up two sentences, opens the gate. This entrance is also very close to the Firelink Shrine elevator to New Londo.
- Alternatively, this gate can be unlocked with the Master Key. This makes Valley of Drakes and Blighttown accessible, from Firelink Shrine, upon arriving in Lordran.
INTRODUCTION AND ADVICE BEFORE YOU BEGIN:
- Blighttown can be a very intimidating place. Stay vigilant; wonky suspended structures, that significantly increase the risk of a fall from heights, and enemies that seem to crawl out of the woodwork are a constant concern until you reach the swamp at the bottom, at which point you'll face a new set of problems. The trick to navigating the opening walkway section is to take your time and keep track of your surroundings.
- You'll encounter a new enemy: the Blowdart Sniper. They can spot you way before you spot them and can turn you toxic with only a couple successful hits from their blowdarts. Being toxic edges being poisonedas it drains your HP much quicker and will likely kill you before you reach the bonfire, unless you have an antidote. It's highly recommended to acquiretoxin/poison cures (click on each to find the respective cures), prior to entering Blighttown, by killing Ents in Darkroot Garden; Ents have a chance to drop 3 items Bloodred moss clump, Purple Moss Clump and the Blooming Purple Moss Clump. For a quicker but more expensive alternative, you can purchase these at the Undead Merchant (female), in the Lower Undead Burg. The Spider Shieldobtained in the Depths, is also invaluable here due to it's poison defense capabilities.
- Once you reach the swamp at the bottom, the Rusted Iron Ring will allow you to move more freely. Find this ring on your return to the Northern Undead Asylum.
The Entrance
Down We Go - From the big doors in Depths, make your way proceed to the left side of the gargantuan hole to find a ladder, followed by some more ladders. At the bottom, a club-wielding Infested Barbarian will welcome you, appropriately. You can climb back up the ladder if you want to deal with him at range. Before proceeding, you will notice a lower level to your right withthree Infested Ghouls hanging out below. If they spot you, there is a ladder at the far back to the right that will allow them to come get you. Keep to the left for the time being, to avoid getting spotted by them. First you need to deal with the two more Infested Barbarians ahead ( Tip: It's possible to lure the other Barbarians back to where you entered the area. If you then go up the first ladder and to the other side of the platform where below you will be beyond the edge of the lower platform; the Infested Barbarians will try to attack you from below, and fall to their death.

That's Not A Bee Sting - Once the Barbarians are gone, proceed to encounter one Infested Ghoulinitially, then two more after, and beware of the Blowdart Sniper next to the ladder at the far right (Tip: Keep your Spider Shield handy to avoid going toxic; engage him after you dispose of the three Infested Ghouls, unless you are confident with your own sniping abilities). Lure them, one at a time, away from the line of fire of the sniper (NOTE: They may get stuck behind the wall in the structure ahead, so you may need to go to them once they are there). Once they're dealt with, advance to the ladder and take out the Blowdart Sniper. Down the ladder there should be three more Infested Ghouls, if you haven't already aggravated them. After disposing of them, make your way to the end of the wooden structure on the left for a Soul of a Proud Knight.
The Upper Walkways
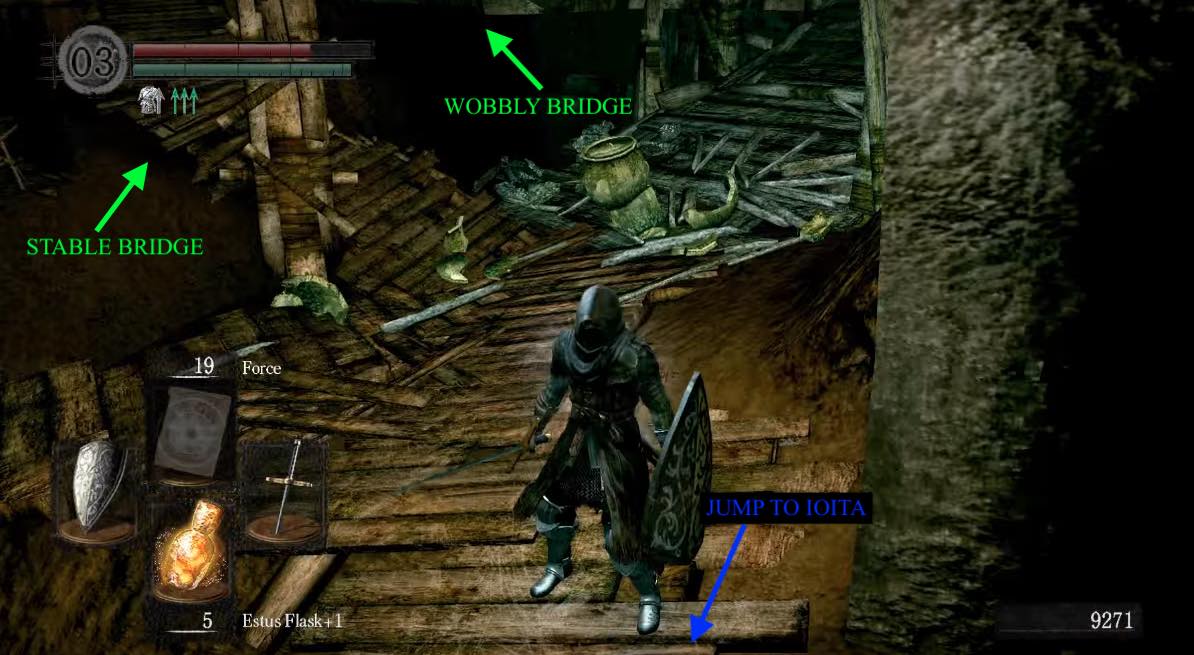
Wonky Places - Head back up to the overhead structure and continue onward to find two small bridges. The first one on your right is a wobbly bridge that will sway from side-to-side as you cross it, there are a few of these in the upper parts of Blighttown and a general rule of thumb for crossing them is to stand still when they start moving. The other bridge just after the first leads to the same area, however this bridge is stationary. However if you continue to the left, on the platform you are currently on, until you reach the edge, you will find a corpse with an item on a lower platform across a gap; the item is a cool weapon and the jump provides a quick way to the bonfire- but the risk at this point is too high. The best thing to do is come back when you've reached already reached the bonfire.
On your right, you may notice an Infested Ghoul with its back to you, if you haven't already triggered it, deal with it then proceed to cross the stationary bridge noted earlier and make your way down the ladder. To your right you'll see a corpse with an item at the bottom of a short drop; dropping down to it will cause you tofall through the floor to a lower level. So instead, use the ramp on the left that leads down and pick-up a Large Soul of a Nameless Soldier from the corpse.
Safe Space - Turn around to continue to another narrow walkway ahead leading to two more Infested Ghoulson the right: the first one is trapped in a vase and the other is at the end of the platform with it's back to you, as most enemies, you should deal with them right away unless told otherwise. Make your way down the ladder, to the left of the walkway, continue leftwards (still facing the ladder) to find the bonfire. To the right of the ladder there are two Flaming Attack Dogs but they will not notice you if you steer clear from the right.
Hot Dogs - Continue past the bonfire to find a descending ladder, at the end of the path, withtwo Infested Ghouls waiting below. Clear them and proceed under the platform to find three Blooming Purple Moss Clumps, on a suspended walkway. Head up the ramp and continue to the left over anotherwobbly bridge, take the ramp on the left to confront two Flaming Attack Dogs. Once you reach the bottom of the short ramp, turn and go around the ramp to find a narrow path just to your left - follow it to find a Humanity item.
Leap of Faith Cool Weapon - Remember we found a cool weapon we said we were going to jump to later? - yes, this is later. Hit the bonfire before attempting this jump to ensure you don't have to venture all the way through this hell-hole again, should your attempt be unsuccessful. Backtrack to tricky jump area (just past where you met the first Blowdart Sniper). You will notice a beam sticking out of the edge - you need to take off on this beam. Missing this jump will land you in the area just below the bonfire, close to the two Flaming Attack Dogs and the Humanity, if you haven't cleared it or used the bonfire -the fall itself for missing the jump shouldn't kill you, so if you think you may miss it, clearing out the area beneath is a good call (Tip :Removing your armor will make you lighter and improve your odds). Make the leap to be rewarded withIaito across the gap.

Facing away from the jump spot, drop down right to go back to the bonfire again. HINT: If you use the bonfire, you may want to consider backtracking a little bit to dispose of a few enemies you encountered before - the last thing you want is to be attacked from behind.
The Lower Walkways
Ninja Please - From the bonfire, head towards and up the ladder you initially came from, where the Infested Ghoul trapped in a vase. At the end this platform, you can drop down to one below on the right. On your left, you should spot a corpse with a Soul of a Proud Knight. Follow the new found platform to the back until you reach a ladderyou can climb to find another corpse with Shadow Set (great for poison resistance). Drop down on the left to find anotherSoul of a Proud Knight.

Eagle Shield - Head back and drop down next to the big torch. Beware of the Blowdart Sniper on the far right and Flaming Attack Dogs (sometimes the dogs are already dead at this point due to falling) on the brick bridge. Lure the dogs and the Infested Ghoul away from the line of sight of the sniper, and dispatch them. Run across the bridge and turn right into the wooden platform where you will be confronted by two more ghouls.
Glorified Flea Slayer - Keep progressing until you see the Parasitic Wall Hugger below on your right and take the ladder down. There will be a ladder in front of you and one to the right. Both will have an Infested Ghoul coming up them at some point, so be ready. You will find a corpse on the first level down with a Soul of a Proud Knight. Take the ladder on the right and kill the ghoul hiding down there. Continue along the path to find another Infested Ghoul around the corner ,at the end of the wooden walkway. You'll see a corpse to your right with the Eagle Shield at the end of a stone walkway.
Make your way back up the ladder and take the other ladder down this time. There is a ramp (with an item) heading down that leads to a ladder on the right, which will take you up to find the Blowdart Sniper from earlier. Watch out for the Infested Ghoul that will come from behind. Follow the path to the cave where you will find another Infested Ghoul inside. The ladder will lead you to the backside of the Parasitic Wall Hugger, where it is vulnerable. But be wary of using short range melee weapons, you can easily slide past the Wall Hugger to a certain death. Also, it will seem like your hits aren't connecting as it doesn't react to them or show any damage indicator or health bar, but they really are so just keep at it.
After killing it, drop down to find a corpse with Pyromancy: Power Within. Head left and down the ramp to pick up aLarge Soul of a Nameless Soldier. There is an Infested Barbarian in the cave to your left. Dispose of it with haste as an Infested Ghoul lurks, not too far behind it. Make your way to the end and down the ladders to find a fog gate. Before entering the fog gate, drop down carefully on the left to find a corpse with a Whip and then make another careful drop on the left. Leave this room to encounter two options: proceed left to continue or head right and up a couple ladders to return to the fog gate you dodged a moment ago (there is no boss fight behind this fog gate).
Blighttown Swamp
Tip: It is advised that you equip the Rusted Iron Ring to enable free movement in the swamp. If you haven't acquired it yet, plan your movements ahead of time as it is possible to use various points of dry land to avoid becoming poisoned; sprinting or rolling through water areas can also reduce likeliness of being poisoned. In the extremely likely event that you get poisoned down here, you don't need to worry to much about the cure, as it takes a long time to die from poison and you should have more than enough time to top up your health with Estus Flasks until you reach the impending bonfire.
This Is My Swamp - Two new enemies will emerge as you proceed: Cragspiders. They're pretty slow and most attacks will cause them to stagger, but they are equipped with a flame attack that can take deal decent damage. Still, if you've made it this far, they shouldn't prove too difficult. Make your way down the ladder until your reach another platform. There is a another ladder to your right. Once below, a Blowdart Sniper will start firing at you from the end of a wooden walkway. It may be best here to drop down to the ledge below (skipping the ladder) to advance on him swiftly. Watch out for the Giant Mosquitoes coming from the right. They come in pairs and they respawn three or four times. You will find the Wanderer Set and the Falchion on a corpse to the left of the Blowdart Sniper.
Turn around and follow the path down, fighting your way through the Mosquitoes and Cragspiders, until you reach the swamp. Take a sharp right and go past the corpse. Continue until you reach a tunnel on your right with a Bonfire inside. Once restored, head back to retrieve the Large Soul of a Proud Knight on the corpse you just ran past. From the bonfire, continue up the tunnel, through the broken gates, to enter an empty room, where you will find a chest holding a Dragon Scale.
Invaded - Just outside the bonfire tunnel, to the right behind the pillar, you will be invaded by Maneater Mildred if you are in human form - she shouldn't be be too hard to dispose of. Once defeated, she drops 3 Humanity and Butcher Knife & will prove to be a very useful ally for the boss fight ahead. She always invades in the same spot, on a point of land just past a Cragspider. Once you learn where it is it is very easy to simply backstab her when she appears.
From the Bonfire take a take a right & dispose of the Cragspiders on the way. The concrete structure to your left has a Large Soul of a Proud Knight as well as a Cragspider behind it. There is another concrete structure behind this one where you will find a Great Club and two Infested Barbarians protecting it. Keep following the wall around, keeping the wall to your right and you will eventually come across a corpse with the Pyromancy: Poison Mist and the Pyromancer Set.
Bloodsuckers - Continue onwards, hugging the right, to find a Large Soul of a Proud Knight on the way. Watch out for the Giant Leech and continue in this direction until you find another Leech on your right. Beyond that, you'll encounterthree Giant Leeches. Continuing right after disposing of those, will bring you to abunch of leeches. Find aLarge Titanite Shard and Server on corpses here. Continue and - surprise, surprise -three more leeches await by the giant tree. To the left of the tree, find two of the last of the Giant Leeches - for now - and Green Titanite Shard. Make your way up the roots of the tree to find a corpse with a Plank Shield in a little alcove in the tree.
Hollow Walls - Strike the wall to the left of the corpse to reveal a hidden path to a chest with Twin Humanities and behind the chest lies yet another illusory wall to hit. Continue on this hidden path if you wish to go to The Great Hollow, otherwise make your way back to the bonfire - it's time to meet the boss.
Quelaag's Domain
Across The Marsh - Leaving the bonfire tunnel, turn and head right, hugging the wall on your right as you go. Head past the wooden ramp, lit with torches, and toward the odd-looking mound right at the end of the area; there is a cave situated on this mound. On your way you should spot someboulder-wielding Infested Barbarians on your left guarding the mound. If you wish against confronting them, its pretty simple, stick to the right as much as possible; you avoid all three of them but may need to kill a Cragspider or two along the way. Also, whilemosquitoesin the vicinity may not be a great threat, ignoring their presence would be ill-advised. En route you will find a Large Titanite Shard. Keeping to the far right, make your way onto the mound. Having arrived at the mound, stay to the right side of it as much as possible, then turn left until you find the cave mouth.
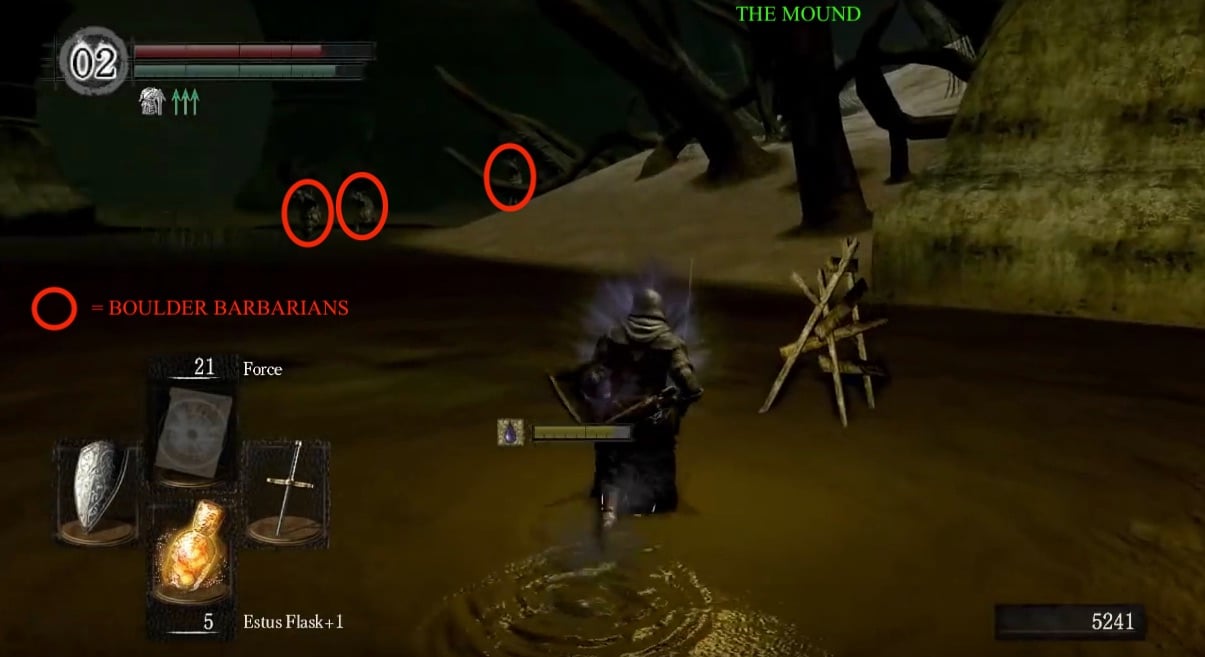
Alternatively: For an arguably more efficient route, head right out of the tunnel containing the bonfire, and then turn left at the large column on your left (which has a cragspider behind it). Continue straight across the water towards the far wall, following it around to the right so you end up facing the large mound with theboulder-wielding Infested Barbarians in the distance. This route passes right by the spot Maneater Mildred invades, so if she does you can also defeat her along the way for additional souls as well as the option to invoke her phantom at thefog gate later. The darkened area with moreboulder-wielding Infested Barbarians should now be on your left as you move forward. Continue straight towards the mound in the distance, moving between the various wooden structures spread out in the water before you reach the spit of land near the mound on the far left side. Done properly, this route will avoid most creatures and you will not aggravate any of theboulder-wielding Infested Barbarians, either to your left or right. You arrive to the hill faster and with much lower poison risk, as there are numerous spots on dry land along the route you can pause to reduce poison buildup. Avoid having to deal with any mosquitoes by taking this route quickly. During jolly co-op, you will beat the host/summons who take the other route above to Quelaag's lair.
Enter The Spider's Lair - At the cave mouth, enter Quelaag's Domain. Down the path you will find some unfortunate souls that have becomeEgg Carriers. They will not attack you and killing them will release some annoying maggot enemies, so it is best to simply ignore them. At the end you will find a fog gate and the summon sign for Maneater Mildred - if you are in human form and killed her during her invasion earlier on. Prepare your best fire resistant gear and any helpful buffs such as Flash Sweat, and then traverse the fog gate.
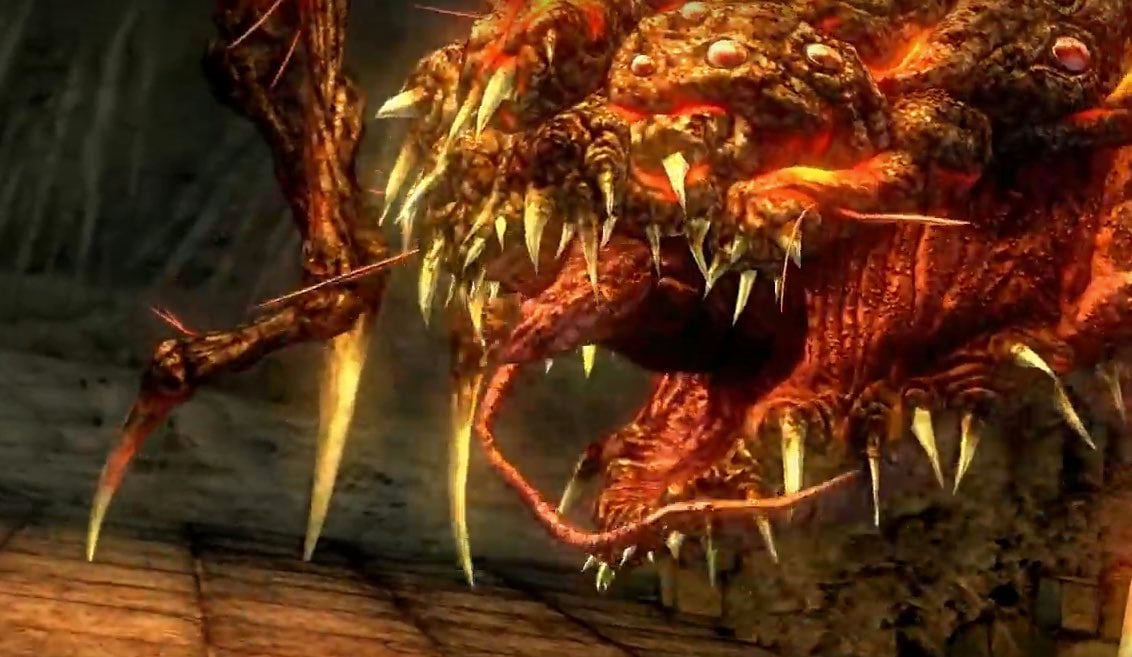
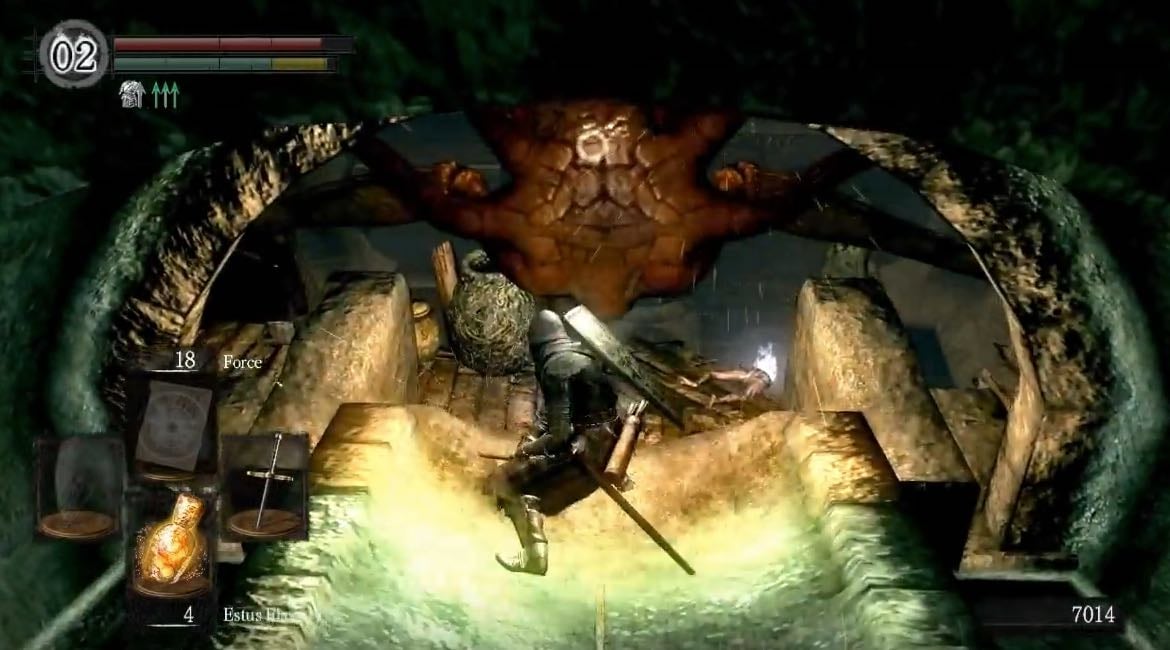
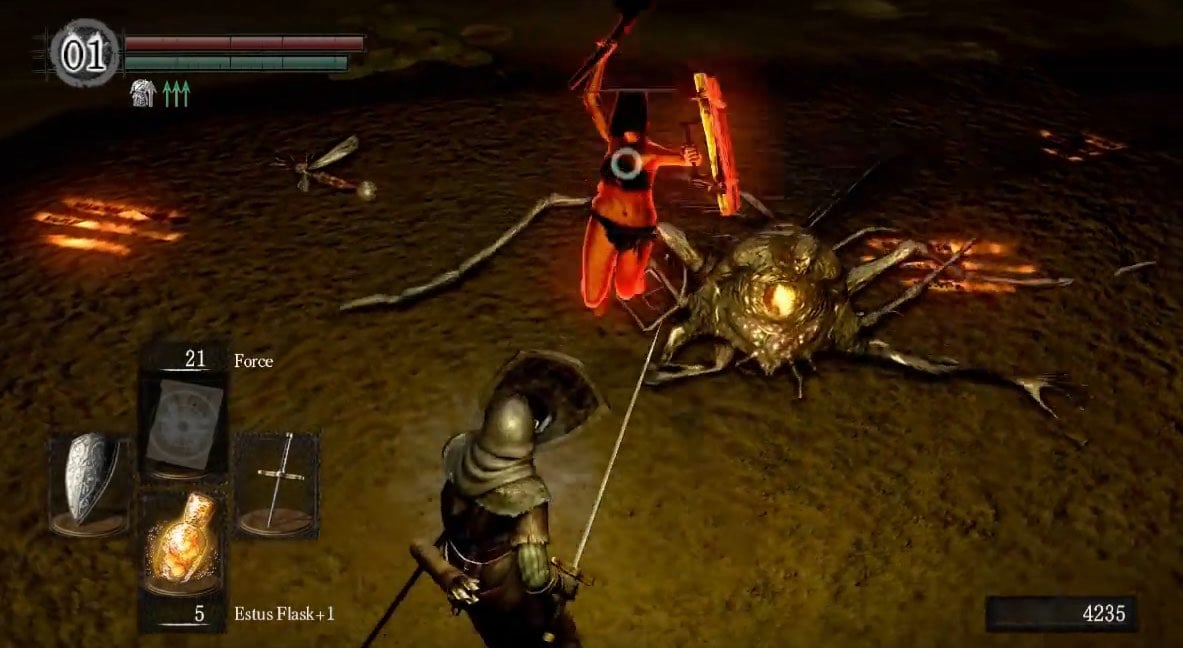
Boss fight: Chaos Witch Quelaag
The Blighttown Bell Tower
Ding Dong - Once Quelaag is defeated, continue in the same direction, up the stairs she descended. At the top, continue down the hall to find a circular room with a hole in the middle, aleveracross the room from where you entered, and a doorway on the right. Pull the lever to ring the second Bell of Awakening and trigger a cinematic, showing the awakening of a Giant that pulls a chain to open the gates to Sen's Fortress - our next destination. Now find the door that leads down a staircase, to a lower part of the bell tower.

Your Majesty - At the bottom of the stairs you will see a circular platform in the centre of the room and a hole in the wall to your left. Directly on the other side of the room lies an illusory wall that leads to a secret area; If you're having difficulties finding the wall, the Orange Guidance Soapstone should give it away. Proceed to findEingyi the egg carrier blocking the way - DO NOT kill him as he becomes a useful Pyromancy trainer. Talk to him and answer 'Yes' to his question and he will then get out of your way and allow you access to find a bonfire & The Ancient Spider Queen / Quelaag's Sister,the Fire Keeper of this bonfire, so it will replenish 10 Estus Flasks with-out any kindling required. You may speak to her but only will you be able to hear what she says if you've acquiredOld Witch's Ring;however, regardless of your possession of the ring, you may join theChaos Servant Covenant through her. She can also reinforce your Estus Flask if you have a Fire Keeper Soul.
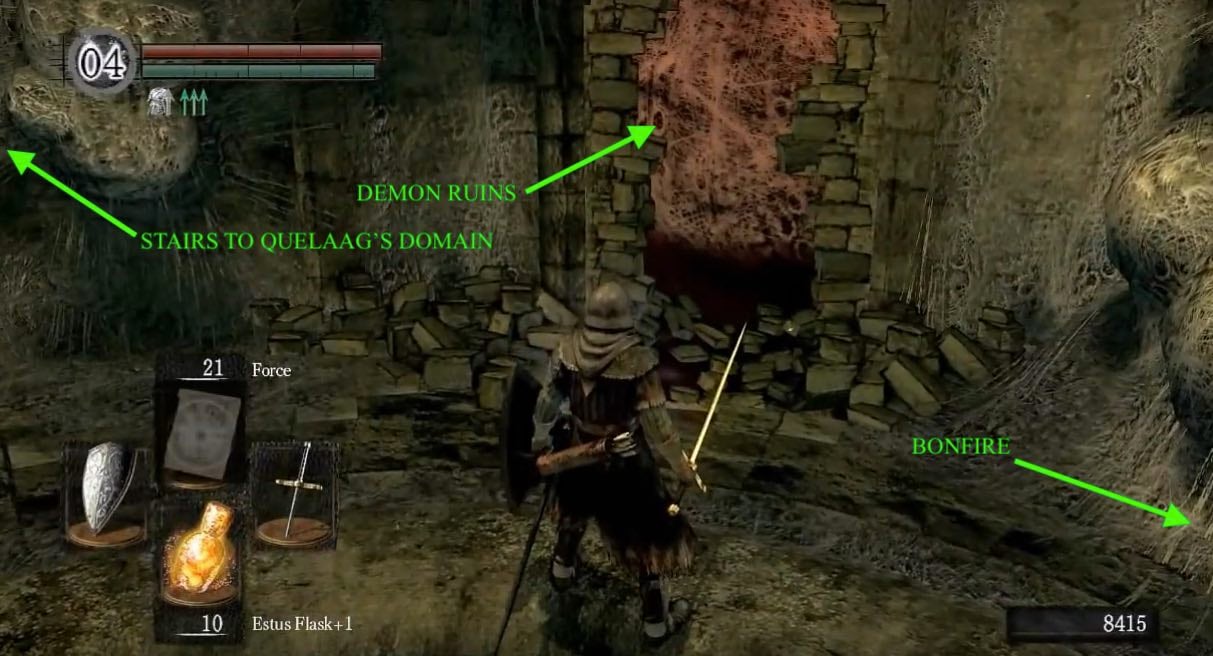
Possible Detour - Head back to the lower floor of the bell tower and have a look in the other hole in the wall down here. This leads down to the Demon Ruins; if you are a Caster, you might want to go down there and get the Gold-Hemmed Black Set (NOTE: Use the "easy way" described on the Ceaseless Discharge boss fight page to beat the boss even with starter gear). Afterwards, head back up and out of Quelaag's Domain, back to Blighttown swamp.
Note: While back in the swamp, if you travel to the giant stone pillars that are closest to the entrance to Quelaag's Domain, you will encounter Quelana of Izalith sitting at the one on the far left. She appears after seeing Quelaag (whether or not you defeated her) or after having had your Pyromancy Flameupgraded to at least +10. She is a very useful Pyromancy trainer and can take your Pyromancy to new heights, as long as you have the souls.
Leaving Blighttown
Finally - As we make our way back to Firelink Shrine, we will be unlocking a shortcut between it and Blighttown, along the way. From the bonfire, take a take a right and make your way up the wooden ramp lit by torches. Jump on the waterwheel blade to take you up and roll onto the platform once you reach the top. There is a ladder to your left (facing away from the waterwheel) to take you up further - watch out for Giant Mosquitoes coming from behind. At the top there's another ladder and a Cragspider to the left of it. Make a note of this area - but you should get rid of some Blowdart Snipers first, so ensure you have your Spider Shield and/or Shadow Set, equipped.
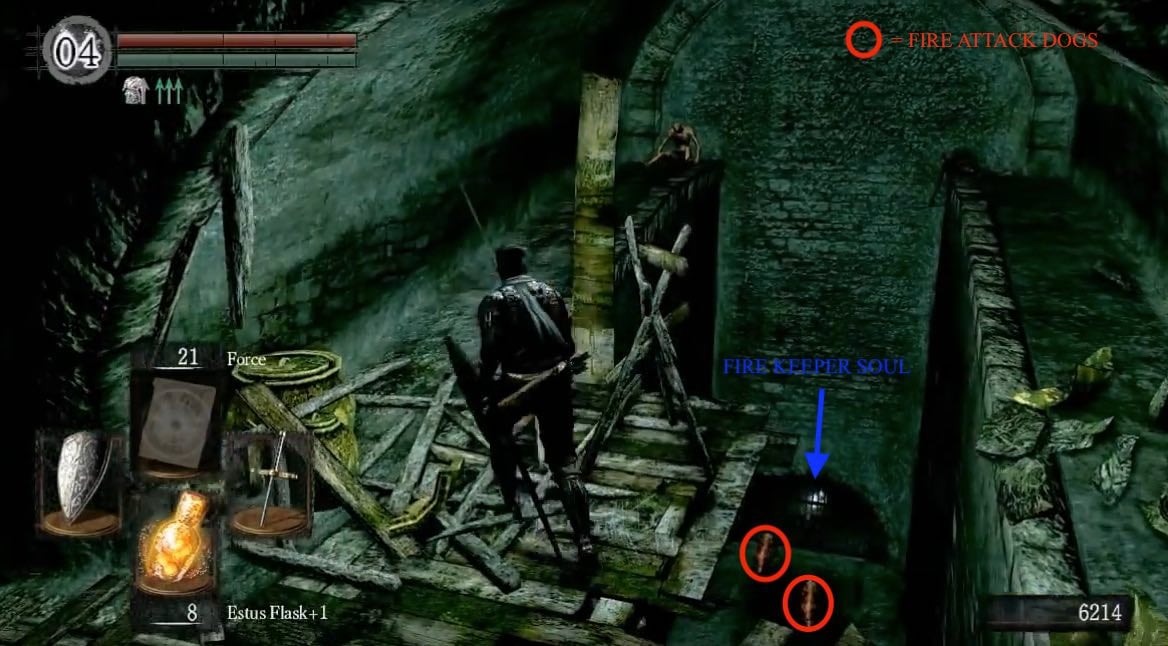
Stings - Make your way up the ladder to find another ladder as well as a Blowdart Sniper. Take him out, move past the ladder and head onto the side ledges of the massive tunnel to your left. There are four Blowdart Snipers in here: two on your right on a ledge across the other side of the tunnel, one on a ledge down a path to the left, and another on the ledge right at the back next to a downward ladder. Stay on the upper ledges, using your shield to block all incoming toxic darts, and watch their threat decrease the closer you get to them. Be careful not to fall down here because you will have to deal with up to seven Attack Flame Dogs down there, which will be a lot harder after taking fall damage. On a ledge down the path to the left you will find will find a Soul of a Proud Knight. Turn around and continue forward and down the ladder on the lower level you will find Purple Moss Clump and a Fire Keeper Soul.
Note: It's advisable at this point to head back to Quelaag's Sister in Quelaag's Domain to reinforce your Estus Flask using the Fire Keeper Soul you just acquired - if you don't do it now you may not be able to do it for a while.
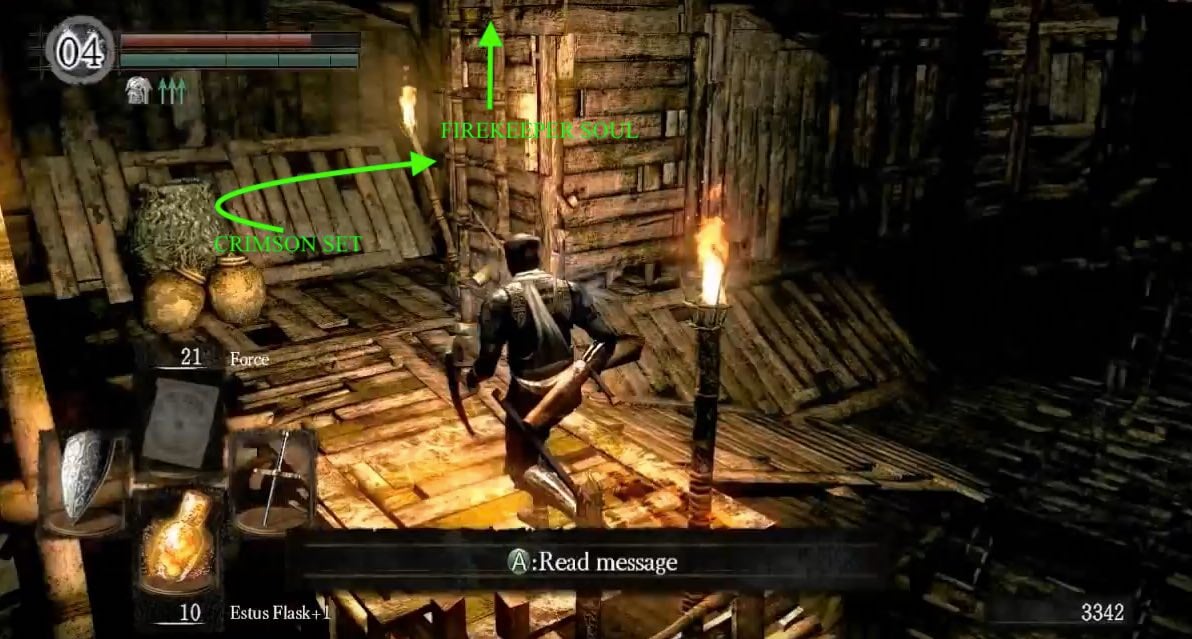
Final Detour - Make your way back to the area noted two paragraphs above and continue along the path, to the left of the ladder you just came from, until you reach a tree branch. Carefully cross it to find a Cragspider on the other side - also beware themosquitoes that will attack you from behind. Continue right, past the ladder to find a corpse with the Crimson Set and Tin Banishment Catalyst and a chest with Sorcery: Remedy.
Okay, Actually Finally - Heading back, ignoring the dead end ladder, backtrack carefully across the branch again and make your way back to the ladder we climbed earlier. Climb it and all subsequent ladders, fighting any Cragspider along the way. At the top on your left there's a cave and to your right, a chest holds the Key to New Londo Ruins. Collect the key and make your way through the cave where the only thing that stands between yourself and the Valley of Drakes , are three Infested Barbarians.
Back To Firelink Shrine
First Steps Out- Cross the wooden bridge just outside and take a left, picking up the item on the way. Here you can use the key you found earlier in the chest (or the Master Key), to access theNew Londo Ruins; however for now, we will just be using to get back to Firelink Shrine.
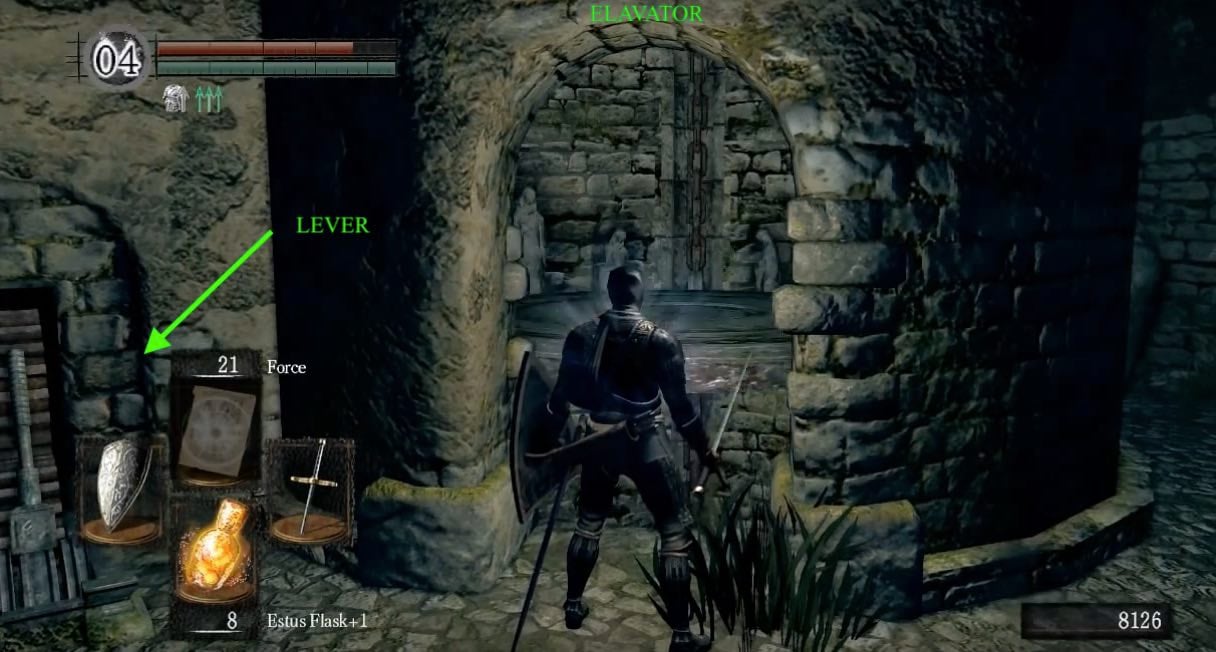
New Londo Stopover - Head down the spiral stairway and follow the wall on the left into a doorway with two flights of stairs that lead up to an elevator. At the beginning of the second flight, quickly check to the right of the staircase to find a Soul of a Nameless Solider (NOTE : If this is your first time here, pull the lever on the left of the elevator shaft to call the lift, because you can fall down the elevator shaft to your death if you're not careful - which would, rather frustratingly, leave you all the way back down at the bottom of Blighttown again). Travel up the elevator and just like that, you're back inFirelink Shrine.
No Fire No Cry - If you freed Knight Lautrec from the Undead Parish - and did not kill him - you may notice that both him and Anastacia of Astora are no longer present on the lower level of Firelink Shrine. He's disappeared from his usual spot andAnastacia's cell now only holds treasure (Dingy Set & a Black Eye Orb) and a note simply reading "Dead". If you didn't notice that then you'll likely notice that the bonfire in Firelink Shrine is now inactive and cannot be lit due toAnastacia's absence - you'll get an opportunity to fix this later.
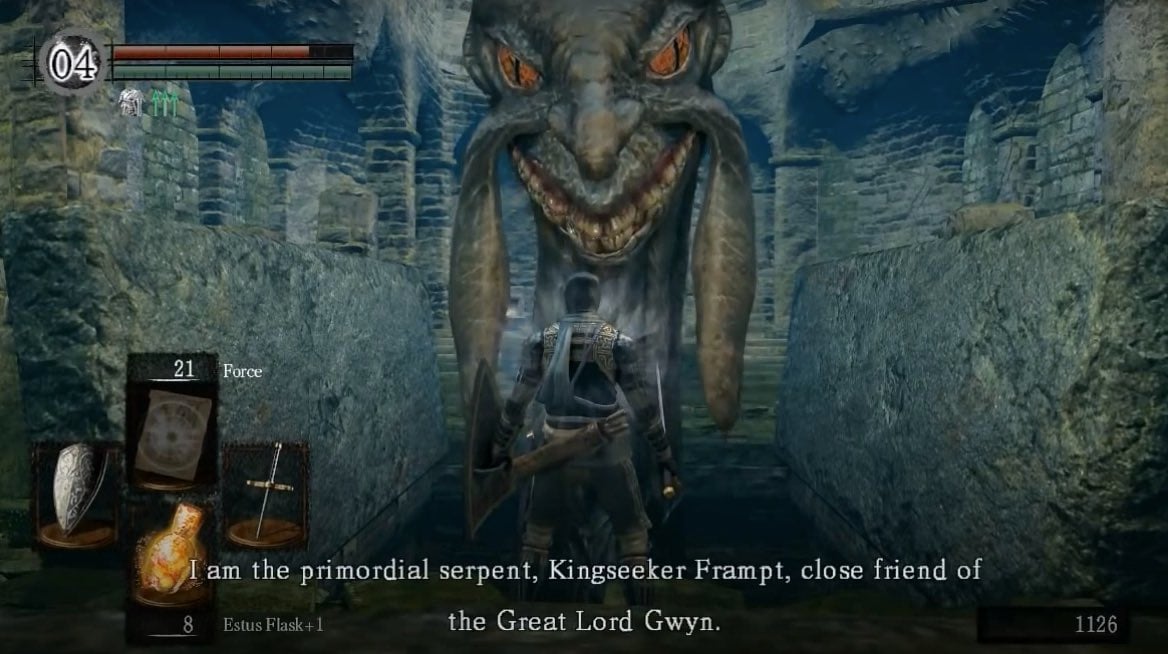
Rise Of Frampt - Go into the previously flooded Firelink ruin to find Kingseeker Frampt, awakened by the ring of the second bell. He'll let you in on some lore and is capable of buying your unwanted equipment in exchange for souls and can also break down your larger titanite items into smaller ones for use in upgrading your equipment - see here for further information.
Closest Bonfire - Travel up the elevator to Undead Parish toward the closestbonfire, above Blacksmith Andrei. Here you should level-up and upgrade your equipment in preparation for the next challenge: Sen's Fortress.
Farming
Leeches - The swamp leeches can be farmed for Large Titanite Shards (Note: I was picking up 2-3 each run! Side note: got 5x Green Shards from 2 of them). They also pop 100 souls a piece making for about 1500 easy souls. Made super easy if you have Rusted Iron Ring and Shadow Garb armor. Simply run up, wail them into oblivion and ignore the poison (with decent resistance the poison shouldn't be an issue - just use an Estus Flask as needed). The leeches have a good drop rate for Green Titanite Shard if you have some humanity. There have been a few occasions where I picked up 20 Green Titanites in one run with 2-4 humanity.
The Infested Barbarians - frequently drop dung pies. You can accumulate a surprising number of them throughout Blighttown, especially if you die a lot. While not hugely valuable on their own, they can be traded toFrampt for 200 souls each, making for a good bonus of souls if you have any business to come back and forth between Blighttown; pyromancy from Quelana or Covenant business.
Blighttown Map
[img goes here]
Speed Run Walkthrough
A fast walkthrough of how to get to the end of the level the fastest, picking up only essential items goes here. Feel free to edit and add your own notes.
Notes & Trivia:
- Maneater Mildred - Her summon sign is found before the fog gate leading to Quelaag, as long as you have already defeated her during her invasion, see below.
- Siegmeyer of Catarina - Found in Blighttown Swamp after you help him in Anor Londo.
- Quelana of Izalith - After you defeat Quelaag and discover the Chaos Servant covenant (you do not need to join) or upgrade your pyromancy flame to +10 she'll be found beside a stone pillar in Blighttown swamp.
- Shiva of the East (Only available if in Forest Hunter Covenant and have previously spoken with him near Alvina)
- Blighttown is the heir of Demon's Souls' Valley of Defilement. It was later succeeded by The Gutter of DS2.
farnsworthsliquichater.blogspot.com
Source: https://darksouls.wiki.fextralife.com/Blighttown
Belum ada Komentar untuk "Easy Way to Return to Firelink After Quelag"
Posting Komentar